모노레포에 패키지를 만들 것이기 때문에 pnpm-workspace.yaml에 packages를 포함할 수 있도록 다음과 같이 수정한다.
packages:
  - "apps/*"
  - "packages/*"
그리고 packages 디렉토리를 만들고, 다음 명령어를 통해 packages에 react 프로젝트를 추가한다.
pnpm create vite shared-library --template react-swc-ts
그 다음 shared-library에 NameContext.tsx 파일을 만들어 Context API를 활용한 컴포넌트를 만들고 index.ts에서 외부에 노출할 수 있도록 한 번 더 export 해준다.
// NameContext.tsx
import { createContext, PropsWithChildren } from "react";

const NameContext = createContext<string | null>(null);

type NameProviderProps = PropsWithChildren<{
  name: string;
}>;
const NameProvider = ({ name, children }: NameProviderProps) => {
  return <NameContext.Provider value={name}>{children}</NameContext.Provider>;
};

export { NameContext, NameProvider };

// index.ts
export { NameContext, NameProvider } from "./NameContext";
vite로 라이브러리를 빌드할 때, 별도의 타입도 export 해야 하므로 별도의 vite plugin을 설치해주어야 한다.
pnpm --filter shared-library add vite-plugin-dts -D
이후 vite 설정을 다음과 같이 변경해주도록 하자.
import { defineConfig } from "vite";
import react from "@vitejs/plugin-react-swc";
import dts from "vite-plugin-dts";
// https://vite.dev/config/
export default defineConfig({
plugins: [
react(),
dts({
insertTypesEntry: true,
rollupTypes: true,
tsconfigPath: "./tsconfig.app.json",
}),
],
build: {
outDir: "./dist",
lib: {
entry: "./src/index.ts",
name: "shared-library",
fileName: "index",
},
// 패키지를 사용하는 쪽에서 필요로하는 라이브러리 설정�
rollupOptions: {
external: ["react", "react-dom"],
output: {
globals: {
react: "React",
"react-dom": "ReactDOM",
},
},
},
},
});
// 참고: tsconfig.app.json
{
"compilerOptions": {
"tsBuildInfoFile": "./node_modules/.tmp/tsconfig.app.tsbuildinfo",
"target": "ES2020",
"useDefineForClassFields": true,
"lib": ["ES2020", "DOM", "DOM.Iterable"],
"module": "ESNext",
"skipLibCheck": true,
/* Bundler mode */
"moduleResolution": "bundler",
"allowImportingTsExtensions": true,
"isolatedModules": true,
"moduleDetection": "force",
"noEmit": true,
"jsx": "react-jsx",
/* Linting */
"strict": true,
"noUnusedLocals": true,
"noUnusedParameters": true,
"noFallthroughCasesInSwitch": true,
"noUncheckedSideEffectImports": true
},
"include": ["src"]
}
- lib: 라이브러리리 모드로 빌드를 한다 (entry를 기준으로 하나의 번들 파일 제작)
- rollupOptions.external: react, react-dom은 번들 안에 포함하지 않고 외부에서 가져오게 설정 (externalization)
- output.globals: UMD 빌드 시, 전역변수 이름 지정
그리고 rollupOptions에 사용하는 쪽에서의 라이브러리 설정 옵션을 추가해주었으므로, package.json의 dependencies를 peerDependencies로 변경해주도록 하자. 그리고 패키지 개발을 위해 기존의 dependencies에 위치해있던 react, react-dom을 devDependencies로 옮겨준다.
추가로 exports, types, main, module 옵션도 각각 추가해준다.
{
  "name": "shared-library",
  "private": true,
  "version": "0.0.0",
  "type": "module",
  "exports": {
    ".": {
      "types": "./dist/index.d.ts",
      "require": "./dist/index.umd.cjs",
      "import": "./dist/index.js"
    }
  },
  "types": "./dist/index.d.ts",
  "main": "./dist/index.umd.cjs",
  "module": "./dist/index.js",
  "scripts": {
    "dev": "vite",
    "build": "tsc -b && vite build",
    "lint": "eslint .",
    "preview": "vite preview"
  },
  "peerDependencies": {
	"react": "^18.2.0",
    "react-dom": "^18.2.0",
  },
  "devDependencies": {
    "@eslint/js": "^9.22.0",
    "@types/react": "^18.2.0",
    "@types/react-dom": "^18.2.0",
    "@vitejs/plugin-react-swc": "^3.8.0",
    "eslint": "^9.22.0",
    "eslint-plugin-react-hooks": "^5.2.0",
    "eslint-plugin-react-refresh": "^0.4.19",
    "globals": "^16.0.0",
    "typescript": "~5.7.2",
    "typescript-eslint": "^8.26.1",
    "vite": "^6.3.1",
    "vite-plugin-dts": "^4.5.3",
	"react": "^18.2.0",
    "react-dom": "^18.2.0",
  }
}
- peerDependencies: 라이브러리를 쓰는 쪽 프로젝트가 직접 의존성을 설치해야한다는 것을 의미한다.
- exports: 패키지를 import 라이브러리했을 때 각각 상황에 맞는 파일을 제공한다. (환경별 파일 대응 가능)
- require: CommonJS 방식으로 가져올 때 사용할 파일
- import: ESM 방식으로 가져올 때 사용할 파일
- types: 타입스크립트 타입 정보를 가져올 때 사용할 파일(d.ts)
- types: 타입스크립트가 패키지를 Import할 때 기본으로 볼 .d.ts 파일 경로. 타입스크립트 컴파일러가 이를 읽어서 자동완성, 타입 검사를 해준다
- main: CJS 환경에서 require 할 때, 기본으로 쓸 파일
- 옛날 Node.js나 CJS 기반 빌드 툴을 쓰는 경우를 위해 필요 (Webpack 4, Jest, Mocha 등 CJS 환경)
- module: ESM에서 import 할 때 기본으로 쓸 파일
- ESM 환경에서 tree-shaking, 최적화된 번들링을 할 수 있다. (Rollup, vite, webpack5, 현대 브라우저)
이제 shared-library를 빌드를 해보도록 하자
pnpm --filter shared-library build
빌드 결과물로 index.js, index.umd.cjs, index.d.ts가 나온 것을 확인할 수 있다.

이제 component-app과 main-app의 dependencies에 shared-library를 각각 추가해주도록 하자.
"shared-library": "workspace:*"
또한, 시맨틱 버저닝이 아닌 "workspace: *"로 버전이 들어가게 되므로 rspack 설정 중 shared 옵션을 다음과 같이 변경하여 싱글톤으로 관리될 수 있도록 한다.
"shared-library": {
  singleton: true,
  requiredVersion: require("../../packages/shared-library/package.json").version
},
각 앱에서 Context 공유해서 사용하기
main-app의 App.tsx를 다음과 같이 변경해보도록 하자.
import React from "react";
import ReactDOM from "react-dom/client";
import Button from "component_app/Button";
import { join, map } from "lodash";
import { NameProvider } from "shared-library";

import "./index.css";

const App = () => (
  <NameProvider name="hello">
    <div className="mt-10 text-3xl mx-auto max-w-6xl">
      <div>Name: main-app</div>
      <div>Framework: react-18</div>
      <div>{join(map(["1", "2"]), "-")}</div>
      <Button
        onClick={() => {
          alert("Clicked");
        }}
      >
        Primary
      </Button>
      <Button variant="warning">Warning</Button>
    </div>
  </NameProvider>
);

const root = ReactDOM.createRoot(document.getElementById("app") as HTMLElement);
root.render(<App />);
이번엔 component-app에서 컨텍스트를 사용해보도록 하자.
import { ButtonHTMLAttributes, PropsWithChildren, useContext } from "react";
import { join, map } from "lodash";
import { NameContext } from "shared-library";

interface ButtonProps extends ButtonHTMLAttributes<HTMLButtonElement> {
  variant?: "warning" | "primary";
}

export default function Button({
  variant = "primary",
  children,
  onClick,
}: PropsWithChildren<ButtonProps>) {
  const name = useContext(NameContext);

  const buttonType = variant === "warning" ? "warning" : "primary";

  return (
    <button style={styleMapping[buttonType]} onClick={onClick}>
      {children} {join(map(["1", "2"]), "-")} {name}
    </button>
  );
}

const styleMapping = {
  primary: {
    marginLeft: "10px",
    color: "#fff",
    backgroundColor: "#409eff",
    borderColor: "#409eff",
    padding: "12px 20px",
    fontSize: "14px",
    borderRadius: "4px",
    outline: "none",
    border: "1px solid #dcdfe6",
    cursor: "pointer",
  },
  warning: {
    marginLeft: "10px",
    color: "#fff",
    backgroundColor: "#e6a23c",
    borderColor: "#e6a23c",
    padding: "12px 20px",
    fontSize: "14px",
    borderRadius: "4px",
    outline: "none",
    border: "1px solid #dcdfe6",
    cursor: "pointer",
  },
};
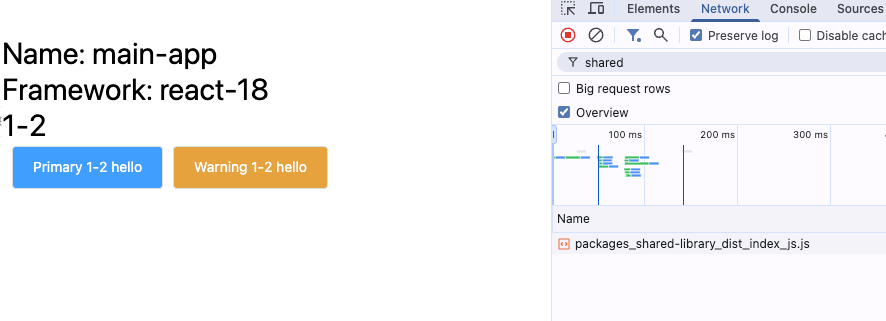
그렇게 되면 하나의 shared-library를 받게 되고, 두 개의 마이크로앱이 Context를 공유할 수 있게 된다.